Friday, November 30, 2012

Holiday To-Do List

Hey there y'all....I am working right now on thinking through all I need to get done in the next few weeks. This is the busiest time of year, so I'm going to use this space to post my to do list, basically. Feel free to do the same and put a link to it in my comments!

*Tag animals for my show tomorrow and decorate my little Christmas tree with my bird ornaments. Plus, come up with a new display board.
* Start making Christmas presents for my family. I already know what I'm doing for my parents and grandparents, but I gotta figure out what I'm getting Suzi Q, my nieces and nephews, and a couple other people. I would post my gift ideas on here, but, uh, some of them read my blog.
* Come up with some awesome Christmas decorations- I'm thinking acorn balls, a chalkboard Christmas tree, Christmas pillows, and hanging letter flags.
* Get ready for my shows on December 7th, 8th, 15th, and 16th. It's gonna be NUTS! There's going to be stuffed animals coming out of my ears.
* Start my official training plan for the half marathon I want to do next summer.
* Practice flute for the Behold the Lamb concert on December 9th.
* Make sure to keep Just Be and Design Archives stocked.

Man, I have a lot to do. Sooo this to do list will be sprinkled with breaks for bubble baths, dates with Charlie, hanging out with my family, and possibly eating Mac and Cheese out of a box a lot so I don't have to cook. Andddd go.

Thursday, November 29, 2012

How-To Videos for Embroidering An Animal Face!

Hey guys! Today I'm posting three videos that will show you how to embroider an animal face. They are longish, but walk you through each step slowly. You could use this technique to put an animal face on a stuffed animal, hat, pillow, or even clothing! If you end up using my video, I'd love to see what you make with it! Just post it here!

Wednesday, November 28, 2012

What I Wore Wednesday and the Pants Solution

Okay, so remember those sad pants that would not be bleached? I told you I wasn't finished with them and here they are!

 Pretty Purple Shirt (thrifted), Green handknitted circle scarf (thanks Jess Chen!), and my now orange pants.
 1. Okeedoke. So the first thing I needed to do was size the pants. They were too big and weren't really skinny pants. I got a pair of skinny pants that fit me and laid them out on top of my cords.


 2. Next, I cut open the seams very very carefully.

3. Then I cut the excess of, leaving 1/4 inch for the seam.

 3. Last I used a zig-zag stitch and stitched up the edges of the pants. After I went back and added the seam. See? Look to the right of the picture and you can see what I did.

4. I decided that even though my pants wouldn't bleach I would still try dying them. This was the color I wanted- Sunshine Orange. Doesn't that sound great?

5. This was the dye process- fill the sink with boiling water from the kettle and dump the dye in. To be honest, this was not the best method because it didn't allow the pants to move freely and dye evenly. I'm going to need to re-dye them eventually to make it totally even. Even so, I love the results!!!


Monday, November 26, 2012

Crafty Monday- Pinterest Fail

Hello hello! I am not one for being able to focus on blogging while my raucous family is around, so apologies for no Thanksgiving post! It was a fabulous time and most of my family was there, about 8 of the kids, 3 in-laws, and 2 parents. We ate lots of delicious food, sang some Christmas songs, played football and corn hole, and did some thrifting and Black Friday shopping (NOT to be repeated lol.) It was great to be with everyone, but it's nice for things to be back to normal now.

Getting back from vacationing time, I decided to get my craft on, to subsequent chagrin.
This post could have so many names, like: "Not Everything You Read On the Internet Is True," "There Is Such Thing As Impossible," "The Little Pants That Could (not be bleached)," and "Sometimes Maybe It's Better To Just Buy It."

Okeedokey, so here's what happened. I had this amazing vision of bleaching out a pair of denim or corduroy pants and dying it mustard, like this girl made hers pink: http://www.thelittlegiggler.com/2012/05/pink-skinny-jeans-re-fashion.html#.ULPCwGgkMr4

Unfortunately, not all pants are created equally and my brown cords simply would not be bleached! I went through two bottles of bleach and NOTHING HAPPENED. I was so mad I poured an entire bottle of comet in too and...absolutely nothing...See?

 Before
and after....

Charlie kept coming in the kitchen/laundry room where I was pouring in the bleach and asking me as nicely as possible why I would't just give up and buy some colored pants. Whatever. I'm not totally done with these pants, so check back for part 2 of this post!

Wednesday, November 21, 2012

What I Wore Wednesday

“Our ability to perceive quality in nature begins, as in art, with the pretty. It expands through successive stages of the beautiful to values as yet uncaptured by language.” 
 Aldo Leopold, A Sand County Almanac: With Other Essays on Conservation from Round River

I love this quote-it expresses so much of what I feel so perfectly, aside from being by one of my heroes. Today has been one of those obviously pretty days. One that everyone can appreciate it-yellow and golden and soft but with a brisk breeze that keeps you awake. Here's what I wore on this pretty day!


 Red dress (hand-me-down), white mid-length sleeve shirt (Old-Navy), navy cardigan (Target), blue tights (Target), and brown shoes (thrift store)

 Cute, huh?
 This is really what I wear on MWF. Cutey patutey in his boba.
 See what a beautiful day it was in my neighborhood?
 The log cabin on my street that I would want to move into if it was in the middle of a forest. Actually I would move into it anyway.
 I accidentally ran into my husband at our local bakery! See how happy he is to see me?

Best bakery ever.

Happy Wednesday y'all!

Tuesday, November 20, 2012

Talk-it-up Tuesday with oKIDDo!

Hey y'all, today I'm going to talk about Ellen from oKiddo. I'm pretty psyched that I get to give a shout out to her and her shop as I've been a big fan for a while.  Ellen makes adorable, good quality kids clothes and stuffed animals with a whimsical twist. Here is some photos from her shop and a little more about her!


Hi there and welcome to my little shop "oKIDDo"!

I am Ellen and mum of three fantastic kids. I've always worked as a primary school teacher and child's psychotherapist. Besides my kids, being creative has always been my biggest passion! As long as I can remember I've always been busy designing and creating my own arty and crafty stuff, using a wide range of materials: at first just for my own children, later also for others.

After emigrating to New Zealand from The Netherlands with my family, I feel it's time for the next big change in my life and follow my dream: designing and creating art and accessories for young children!

A year ago I decided it was time and started designing and creating my own baby-line and founded "oKIDDo - Kid's Art and Accessories". Since then I've sold my pieces and Baby Shower Gift Baskets online and on local markets, with succes and a lot of positive feedback!

Everything at "oKIDDo" is handmade with natural materials. I'm trying to choose pieces that are contemporary yet timeless. I focus on simplicity and practicality and on graphics and colors that appeal to modern kids and their parents.

All pieces can be purchased separately, but can also be combined.
It's possible to purchase ready-made Baby Shower Gift Baskets or you can combine pieces and make your own!
Baby gift baskets are available in two different sizes and prices and always include an acrylic painting. If you wish, this painting can be personalized with the name and birth date of the child on it or painted in matching colors with the child's room.
Anything is possible: just mix and match to your hearts content and let me know!

Enjoy!

Ellen

Monday, November 19, 2012

Make-it Monday: fingerless gloves!

The other day I came home and saw something sad on my floor. My naughty pup, Maeby, was annoyed at the ONE day since I've gotten her that she hadn't been walked in the morning, and she wreaked her revenge by chewing up my beautiful new banana republic gloves that I found at a yard sale. If she hadn't looked so cute and and I hadn't been worried she might have swallowed the buttons on it I would have been M-A-D! As it was, I was still pretty sad she ruined my pretty gloves. So I decided to make some new gloves! I think they turned out okay although I think I might pick a different fabric next time.

Fingerless Gloves-
What You'll Need:
Old sweater or any thick fabric with a good amount of stretch
A secondary contrasting fabric, old sleeve cuffs work well
A sewing machine!

 1. First, get it all together.

 2. Next, remove any fabric you aren't going to need.

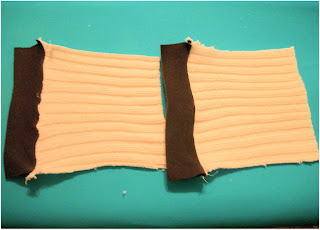
 3. Measure the narrowest part of your wrist and add half an inch to that measurement. Next, cut two squares. One side should be the measurement from your wrist, the other side can be however far down your arm you want your glove to go. For the secondary fabric cut the same length on one side, just narrower. This is where using cuffs from t-shirts can come in handy cause it removes a lot of work!

 4. Sew the cuffs onto the squares.

 5. Stitch up the sides of the gloves and turn them inside out. If your squares aren't pre-hemmed, use a zig-zag stitch on the top of your gloves at this point to keep them from fraying. You might need to do that to the inner seam as well if it's a particularly fraying-prone fabric.

 6. Use the zig-sag stitch to put a few stitches in about an inch in at the top of the glove to make a finger-hole. Do that on both gloves. And bing bang boom you have two new gloves!