Wednesday, December 12, 2012

What I Wore Wednesday

 Yellow hat that I made, my trusty green scarf handmade by Jess, floral short sleeve dress (hand-me-down), black cardigan (Goodwill), leggings (Target), and brown boots (Plato's Closet)
 Couldn't get a full shot of my outfit, but I really like it! I'm realizing how I can keep using Spring or Summer clothes through the colder seasons with some creative layering. And I crazy love my new leggings!

I loooove these boots. Charlie said I look like a Nashville princess, which I think was his way of saying I look like a cowgirl. Oh well, there are definitely worse things!

Baking Soda Ornaments

Oh man oh man!
I have been so very sick the past couple days. Just a bad cough but that combined with having a too long to-do list equaled pure exhaustion. I had a show in Athens, Georgia on Saturday and it was a good show but I think I learned my lesson about pushing past not feeling well. I was outside in the cold all day and didn't get a chance to eat until a fellow vendor took pity on me and gave me some pretzels! It ended up being worth it though, because I got to see my cousin that I haven't seen in years and her new husband!

My cousin had made these lovely Christmas ornaments (she gave me one) out of baking soda and cornstarch and I was so impressed I had to make my own! So here is how to make really inexpensive, totally custom ornaments!

Baking Soda Ornaments
You Need:
2 Cups Baking Soda
1 Cup Cornstarch
1 1/2 Cups Water
Watercolors or Sharpies

Step One: Stir together the baking soda and cornstarch in a saucepan and then add the water.

Step Two: Heat the mixture over low heat, stirring constantly.

Step Three: The mixture will start to bubble and then thicken. When the mixture is thick enough to form a ball and leave the sides of the pan, it is ready.

Step Four: Put the mixture onto some wax paper and wrap it up. Leave it to cool and thicken a bit more for a few minutes.

Step Five: Roll the dough out between two pieces of wax paper so it doesn't stick. Use cookie cutters or can lids to cut out shapes you like. This is a great time to get the kiddos involved! It's even more fun than playing with play dough because it's softer and they get to make it into something permanent!

Step Six: Using a toothpick, make a hole in the top of each ornament (to hang them) and if you want, scratch out a design or words on the ornament.

Step Seven: Bake in the oven on 300 for 30 minutes or until the bottoms of the ornaments are hard. Be careful not to crack them when you are checking!

Step Eight: Paint! Use watercolors or if you are feeling low maintenance, sharpies!


Wednesday, December 5, 2012

What I Wore Wednesday- Lacey Jeans

I missed Make it Monday this week because I was hang in out with my lovely sisters and just couldn't squeeze it in, but last night I got my crafting on and did these pants! Scroll past the pictures to see how I did them!

 Teal shirt from Forever 21 (Thanks Abbsters), Checked Scarf from Ihavenoclue, Peacock Earrings (they actually belong to Abbsters), Toms, brown belt, and diy jeans (originally New York and Company)


Alright, so these pants were really simple. I made some regular jeans into skinny jeans in the same way that I did my cords (look at my previous posts) and hot glued some lace into the pockets. SheZAM! That's seriously it and they are seriously cute, no?

Friday, November 30, 2012

Holiday To-Do List

Hey there y'all....I am working right now on thinking through all I need to get done in the next few weeks. This is the busiest time of year, so I'm going to use this space to post my to do list, basically. Feel free to do the same and put a link to it in my comments!

*Tag animals for my show tomorrow and decorate my little Christmas tree with my bird ornaments. Plus, come up with a new display board.
* Start making Christmas presents for my family. I already know what I'm doing for my parents and grandparents, but I gotta figure out what I'm getting Suzi Q, my nieces and nephews, and a couple other people. I would post my gift ideas on here, but, uh, some of them read my blog.
* Come up with some awesome Christmas decorations- I'm thinking acorn balls, a chalkboard Christmas tree, Christmas pillows, and hanging letter flags.
* Get ready for my shows on December 7th, 8th, 15th, and 16th. It's gonna be NUTS! There's going to be stuffed animals coming out of my ears.
* Start my official training plan for the half marathon I want to do next summer.
* Practice flute for the Behold the Lamb concert on December 9th.
* Make sure to keep Just Be and Design Archives stocked.

Man, I have a lot to do. Sooo this to do list will be sprinkled with breaks for bubble baths, dates with Charlie, hanging out with my family, and possibly eating Mac and Cheese out of a box a lot so I don't have to cook. Andddd go.

Thursday, November 29, 2012

How-To Videos for Embroidering An Animal Face!

Hey guys! Today I'm posting three videos that will show you how to embroider an animal face. They are longish, but walk you through each step slowly. You could use this technique to put an animal face on a stuffed animal, hat, pillow, or even clothing! If you end up using my video, I'd love to see what you make with it! Just post it here!

Wednesday, November 28, 2012

What I Wore Wednesday and the Pants Solution

Okay, so remember those sad pants that would not be bleached? I told you I wasn't finished with them and here they are!

 Pretty Purple Shirt (thrifted), Green handknitted circle scarf (thanks Jess Chen!), and my now orange pants.
 1. Okeedoke. So the first thing I needed to do was size the pants. They were too big and weren't really skinny pants. I got a pair of skinny pants that fit me and laid them out on top of my cords.


 2. Next, I cut open the seams very very carefully.

3. Then I cut the excess of, leaving 1/4 inch for the seam.

 3. Last I used a zig-zag stitch and stitched up the edges of the pants. After I went back and added the seam. See? Look to the right of the picture and you can see what I did.

4. I decided that even though my pants wouldn't bleach I would still try dying them. This was the color I wanted- Sunshine Orange. Doesn't that sound great?

5. This was the dye process- fill the sink with boiling water from the kettle and dump the dye in. To be honest, this was not the best method because it didn't allow the pants to move freely and dye evenly. I'm going to need to re-dye them eventually to make it totally even. Even so, I love the results!!!


Monday, November 26, 2012

Crafty Monday- Pinterest Fail

Hello hello! I am not one for being able to focus on blogging while my raucous family is around, so apologies for no Thanksgiving post! It was a fabulous time and most of my family was there, about 8 of the kids, 3 in-laws, and 2 parents. We ate lots of delicious food, sang some Christmas songs, played football and corn hole, and did some thrifting and Black Friday shopping (NOT to be repeated lol.) It was great to be with everyone, but it's nice for things to be back to normal now.

Getting back from vacationing time, I decided to get my craft on, to subsequent chagrin.
This post could have so many names, like: "Not Everything You Read On the Internet Is True," "There Is Such Thing As Impossible," "The Little Pants That Could (not be bleached)," and "Sometimes Maybe It's Better To Just Buy It."

Okeedokey, so here's what happened. I had this amazing vision of bleaching out a pair of denim or corduroy pants and dying it mustard, like this girl made hers pink: http://www.thelittlegiggler.com/2012/05/pink-skinny-jeans-re-fashion.html#.ULPCwGgkMr4

Unfortunately, not all pants are created equally and my brown cords simply would not be bleached! I went through two bottles of bleach and NOTHING HAPPENED. I was so mad I poured an entire bottle of comet in too and...absolutely nothing...See?

 Before
and after....

Charlie kept coming in the kitchen/laundry room where I was pouring in the bleach and asking me as nicely as possible why I would't just give up and buy some colored pants. Whatever. I'm not totally done with these pants, so check back for part 2 of this post!

Wednesday, November 21, 2012

What I Wore Wednesday

“Our ability to perceive quality in nature begins, as in art, with the pretty. It expands through successive stages of the beautiful to values as yet uncaptured by language.” 
 Aldo Leopold, A Sand County Almanac: With Other Essays on Conservation from Round River

I love this quote-it expresses so much of what I feel so perfectly, aside from being by one of my heroes. Today has been one of those obviously pretty days. One that everyone can appreciate it-yellow and golden and soft but with a brisk breeze that keeps you awake. Here's what I wore on this pretty day!


 Red dress (hand-me-down), white mid-length sleeve shirt (Old-Navy), navy cardigan (Target), blue tights (Target), and brown shoes (thrift store)

 Cute, huh?
 This is really what I wear on MWF. Cutey patutey in his boba.
 See what a beautiful day it was in my neighborhood?
 The log cabin on my street that I would want to move into if it was in the middle of a forest. Actually I would move into it anyway.
 I accidentally ran into my husband at our local bakery! See how happy he is to see me?

Best bakery ever.

Happy Wednesday y'all!

Tuesday, November 20, 2012

Talk-it-up Tuesday with oKIDDo!

Hey y'all, today I'm going to talk about Ellen from oKiddo. I'm pretty psyched that I get to give a shout out to her and her shop as I've been a big fan for a while.  Ellen makes adorable, good quality kids clothes and stuffed animals with a whimsical twist. Here is some photos from her shop and a little more about her!


Hi there and welcome to my little shop "oKIDDo"!

I am Ellen and mum of three fantastic kids. I've always worked as a primary school teacher and child's psychotherapist. Besides my kids, being creative has always been my biggest passion! As long as I can remember I've always been busy designing and creating my own arty and crafty stuff, using a wide range of materials: at first just for my own children, later also for others.

After emigrating to New Zealand from The Netherlands with my family, I feel it's time for the next big change in my life and follow my dream: designing and creating art and accessories for young children!

A year ago I decided it was time and started designing and creating my own baby-line and founded "oKIDDo - Kid's Art and Accessories". Since then I've sold my pieces and Baby Shower Gift Baskets online and on local markets, with succes and a lot of positive feedback!

Everything at "oKIDDo" is handmade with natural materials. I'm trying to choose pieces that are contemporary yet timeless. I focus on simplicity and practicality and on graphics and colors that appeal to modern kids and their parents.

All pieces can be purchased separately, but can also be combined.
It's possible to purchase ready-made Baby Shower Gift Baskets or you can combine pieces and make your own!
Baby gift baskets are available in two different sizes and prices and always include an acrylic painting. If you wish, this painting can be personalized with the name and birth date of the child on it or painted in matching colors with the child's room.
Anything is possible: just mix and match to your hearts content and let me know!

Enjoy!

Ellen

Monday, November 19, 2012

Make-it Monday: fingerless gloves!

The other day I came home and saw something sad on my floor. My naughty pup, Maeby, was annoyed at the ONE day since I've gotten her that she hadn't been walked in the morning, and she wreaked her revenge by chewing up my beautiful new banana republic gloves that I found at a yard sale. If she hadn't looked so cute and and I hadn't been worried she might have swallowed the buttons on it I would have been M-A-D! As it was, I was still pretty sad she ruined my pretty gloves. So I decided to make some new gloves! I think they turned out okay although I think I might pick a different fabric next time.

Fingerless Gloves-
What You'll Need:
Old sweater or any thick fabric with a good amount of stretch
A secondary contrasting fabric, old sleeve cuffs work well
A sewing machine!

 1. First, get it all together.

 2. Next, remove any fabric you aren't going to need.

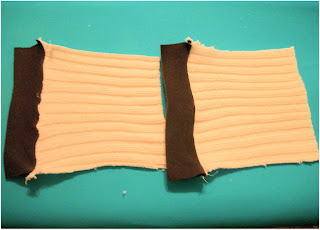
 3. Measure the narrowest part of your wrist and add half an inch to that measurement. Next, cut two squares. One side should be the measurement from your wrist, the other side can be however far down your arm you want your glove to go. For the secondary fabric cut the same length on one side, just narrower. This is where using cuffs from t-shirts can come in handy cause it removes a lot of work!

 4. Sew the cuffs onto the squares.

 5. Stitch up the sides of the gloves and turn them inside out. If your squares aren't pre-hemmed, use a zig-zag stitch on the top of your gloves at this point to keep them from fraying. You might need to do that to the inner seam as well if it's a particularly fraying-prone fabric.

 6. Use the zig-sag stitch to put a few stitches in about an inch in at the top of the glove to make a finger-hole. Do that on both gloves. And bing bang boom you have two new gloves!


Friday, November 16, 2012

Pre-show Madness

Tomorrow I am doing a show at the Children's Museum in Greensboro. It won't be a huge one, but it should be pretty fun, and, as usual, getting ready for a show means staying up late re-tagging items, making last minute critters, and in general, re-thinking my entire way of doing things as I anticipate strangers critiquing my work. I love the post-show feeling, even if I don't sell much, but pre-show is usually pure nervousness! I managed to make it through and finish before midnight though, so I'm going to take a bath and crash. I just want to leave you with a couple samples of the photos my sister took for my shop yesterday! Thank you Hannah! I'll have more up in a couple days.


Wednesday, November 14, 2012

Lazy Dayz- What I Wore Wednesday

Hey, good morning all! The kiddos I nanny for are little sickies today, so one is asleep and the other is zoning out to Go Diego Go!, the kids' show where the little boy yells Spanish words in repetition, occasionally to a melody. It's funny because I love most things that are made for kids, but kids' tv shows are almost all brain-numbingly dull.  Oh well, at least little man is happy!

Here is what I put on today!


 Black Cardigan (Goodwill), Flowy Shirt with lace and embroidery (Hand-me-down), Jeans (Hand-me-down), and my trusty black boots.


I positively love the lace and embroidery on this shirt-it makes me feel pretty and dressed-up without having to bother with wearing jewelry or put on tons of extra clothes. Which works great for a lazy tv-watching kinda day!


Tuesday, November 13, 2012

Talk-It-Up Tuesday

Good morning peeps! I think I'm going to use my Tuesday blog days as good days to promote other creative Etsy artists! There are so many wonderful/crafter artists on Etsy and I would love to be able to help even a couple of them get seen. I have a really deep respect for so many of these artists, probably especially so because I know what it's like to love what you create and want other people to as well. It gets confusing balancing creativity and enjoyment with practicality and the reality of needing to make money. I respect the people who find a way to make it happen without losing their passion!

I started a team on Etsy called Stuffed Animals of Etsy for stuffed animal creators to encourage and support one another. Here is one of the lovely ladies in my team!

Mama Mayberrys-

Hello! 

I am a full-time Mom and a part-time artist. I have a BFA and an MFA in painting but I have always loved sewing. I've been sewing since I was a little girl. When I was a girl scout, I learned how to make my first skirt, and I was hooked! I made my own clothes and handbags for years then started making clothes and costumes for my kids. When they began requesting stuffed animals I discovered that making toys is a lot of fun! 

I like toys with a little humor. I want them to be funny, cute, and silly. Well, at least they make me laugh! I also try to make everything as durable as I can. As a Mom I know, toys need to be able to withstand lots of love!

Thanks for visiting my little plush toy shop! I hope my little toys will brighten your day and make you smile! Please come back again soon!. I will be adding new items regularly!

Kristin (Mama Mayberry)

Monday, November 12, 2012

Make It Monday- Upgraded Shoeboxes

It's Monday and I decided to use my making time to help out my studio a bit. It is cute in spots, like the old wood cabinet I found on the side of the road and cleaned up, or the chair I found and recovered (impractically) in pretty white fabric. Charlie keeps coming in and sighing and saying he thinks my room should look better since it's my inspiration space, so little by little I'm trying to make it more inspiring.

I have so many odds and ends I need to store, so using shoeboxes makes a lot of sense, but come on, they are just so ugly! So I decided to prettify them a bit! Here's what I came up with and how you can make it too:


What you will need:
A box with removable lid
Brown butcher paper
Tape
Hot glue gun
Scrap fabric
Chalk
Scissors

1. Gather up the things you need and find a flat surface to work on and plug up the hot glue gun. First thing you want to do is take care of the lid. To cover it up with butcher paper, lay the lid on the paper and trace around it, leaving a couple inches to spare to wrap over the lip. Cut out the paper. Then fold the paper over the edges of the lid as neatly as you can and tape it down.


2. Next, cut a piece of butcher paper that is two inches higher than the height of the box and two inches longer than the perimeter of the box. Then, wrap the paper around the box like this.


3. Next, fold over the two end pieces in the middle of one of the sides so they touch and tape them down. Then, tape the extra paper over the lip on the top and bottom of the box so it looks like this: 


4. I decided I wanted little flags on the side of my box, so I cut the fabric into three flags. Using the hot glue gun, glue the fabric down on the middle one so that it covers the tape. Then glue the other flags down on either side of it.


5. Cute, huh? Then, as I am really super forgetful, I needed a way to label the box and hopefully to change the label if need be. Chalk works pretty well on butcher paper and you just need to wipe it off with a damp (not wet) washcloth. Check this out!


 What do you think? I think I'm going to make like 20 million more of these.